Tuesday, April 7, 2020
Facebook Live @ArtsinStark 4/8/2020
Sort of last minute notice here on the blog, but tomorrow (4/8/2020) I will be doing a Facebook Live Egg Workshop on the @ArtsinStark Facebook Page. ArtsinStark is the Stark County, Ohio arts council. They're in the middle of their spring fundraising campaign - with a goal of $1.6 million for the arts. If you are interested in helping to support them - you can donate at www.artsinstark.com/donate or right on their Facebook page.
Monday, April 6, 2020
How to Blow Out an Egg
It has come to my attention that some of you don't know how to blow out an egg.
If you are interested in keeping your eggs for years (and not having them smell, OBVIOUSLY), you can easily blow out the egg innards. Plan ahead for scrambled eggs or omelettes.
Also: Wiki-How has a detailed page on how to do this. With graphics even.
Sunday, April 14, 2019
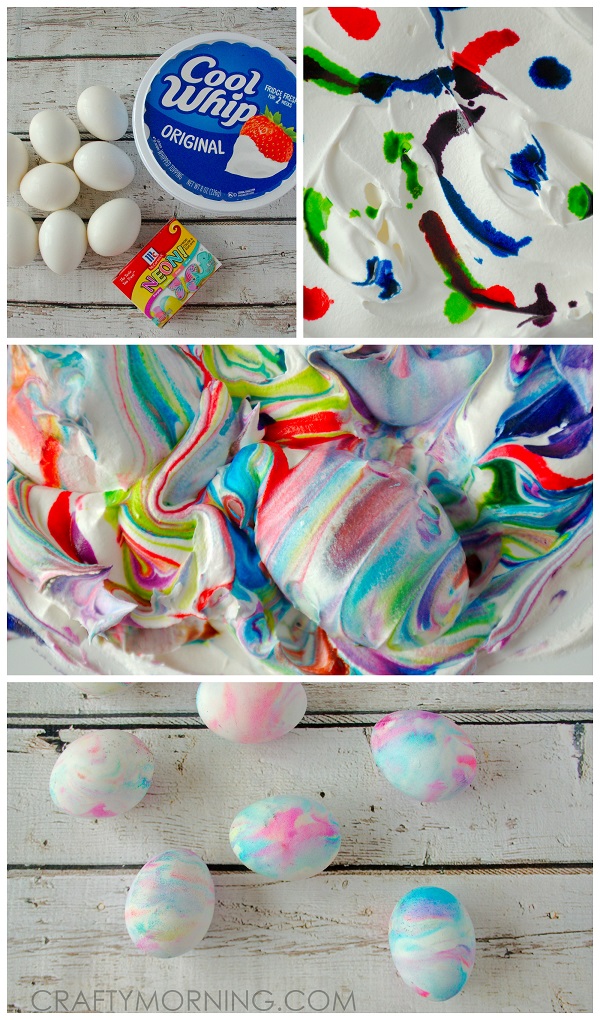
Cool Whip Dyed Eggs
Cool Whip Dyed Eggs
(Marbled Eggs)
This is similar to the art teacher/crafts version of marbling paper with shaving cream --- but USE EDIBLE Cool Whip to make these beauties.
CraftyMorning.com provides a great step-by-step to follow, and it's super easy. Messy in it's own way, but you don't have to deal with all the containers of liquid.
LINK: https://www.craftymorning.com/cool-whip-dyed-easter-eggs/
Sunday, April 13, 2014
Not so wishy-WASHI (tape)!
Stampington & Company shared this idea by Jennifer Taylor that uses (besides hard-boiled eggs) washi tape and permanent pens. If you haven't already discovered washi tape, visit the craft store and find some --- it's one of my new favorite supplies to have on hand. It makes stuff super-cute super easily.
Friday, March 21, 2014
Tie Dyed Eggs (No Boiling)
Tie Dye Easter Eggs
Found on funathomewithkids.com
Materials (besides hard boiled eggs):
Paper towels
Tray (for paper towels to lay flat in)
Food coloring
Plastic Bags
Rubber bands
Spray bottle with vinegar water
If you visit the link above, she has photos of the steps involved.
You can do this.
I have faith in you.
Sunday, March 16, 2014
E-Z Ombre Eggs
A friend just sent me this one... SUPER easy ombre eggs!
Saturday, March 9, 2013
Hey Kool-Aid!
Kool-Aid Tie Dye Easter Eggs
Basically, two packets of un-sweetened Kool-Aid (per color) and water. Instructions on the link above. Reports are the scent fades (rats). Reports are also that certain colors work better than others, and that the eggs might taste like that flavor (sort of gross, depending on the flavor).
I haven't tried this one, but I have tie-dyed entire t-shirts and that works, so why not eggs?
Thursday, January 17, 2013
Watercolor Eggs - Mighty pretty, but don't eat 'em
OH MY! Creative features a post on using regular watercolor paints (her dad's) to decorate eggs. She paints them, uses plastic wrap with watercolor to do a texture, and also bleeds them. Beautiful stuff!
However, these are "just for looking at." You might even want to seal them.
Here's the link: Watercolor Easter Eggs - A New Way to Decorate Eggs

However, these are "just for looking at." You might even want to seal them.
Here's the link: Watercolor Easter Eggs - A New Way to Decorate Eggs
Saturday, April 7, 2012
Egg Week! on Pinterest
If you are the type who "pins," you should know I also have an Egg Week board on Pinterest: http://pinterest.com/sarahshu/egg-week/I have most of the blog entries on there, and also many more types of egg decorating ideas (and other fun things that go along with Egg Week).
Saturday, March 31, 2012
Chalkboard Paint
You can make these cute eggs that have been painted with chalkboard paint.
Nowadays, you can buy small cans of chalkboard paint for a decent price in the craft or paint sections of many, many stores.
Alternative: Black acrylic paint, and paint markers (permanent designs). Especially if you are blowing the innards out of your eggs and want to save them for other Easters.
Thursday, March 29, 2012
Lace Eggs
You can use pieces of lace to decorate eggs as well. Get the best part of the design on the egg, wrap tight (tie off with a rubber band) and dye.
This photo is from Cottage Farm Villa who used lace and doilies to create her eggs.
Martha has a great video demonstrating this one:
http://www.marthastewart.com/245983/lace-easter-eggs
Wednesday, March 28, 2012
All things Rubber
I don't have individual photos for these two techniques, so bear with me.
TOP CENTER (sort of blue with light green designs): Rubber Cement Dripped on Eggs
Rubber Cement: Dye the egg first if you wish. Then drizzle on rubber cement. Let dry and then dye the egg. Remove rubber cement.
Because some of you will ask... the spiral one is Sharpie Markers, the checkerboard ones are done with electrical tape! :)
Labels:
rubber bands,
rubber cement,
Sharie Markers
Collaged Eggs
Well, being a mixed-media artist, I'm sort of partial to collage art.
You can collage things onto your eggs.
- No, you probably DON'T want to eat them.
- Even better, blow the innards out, wash them, then collage them... and you can keep them from year to year.
You will need gel medium (matte or gloss finish). Brush on a thin layer of the gel medium, then the tissue or whatever, then one more layer of the gel medium.
For these eggs I used:
Top Left: Torn bits of mulberry paper (go to the art/craft supply store).
Top Right: Bits of a road map.
Bottom Right: Napkin
Bottom Left: Sewing pattern pieces
Tuesday, March 27, 2012
Metallic Paint

After your eggs have dried, you can add acrylic paint. One of my favorites is to sponge (or wadded up paper towel) on metallic paint over a contrasting color.
Again, I have no idea if you could/should eat these. For me, it's all about how the egg looks.
Monday, March 26, 2012
Shine Your Eggs
Shiny, Happy Eggs!
Use a dab of vegetable oil (olive oil, whatever) on a paper towel to shine up your eggs when you are finished with them. This can really help to make average eggs look fabulous!
If you have collaged papers on to your egg - coat with gel medium varnish or a coat of gloss polyurethane (but don't eat those eggs, you know).
Traditional Rainbow
An oldie, but a goodie...
To make the traditional rainbow egg:
1) Dye half yellow.
2) Dye the other half red/pink.
3) Dye HALF of the yellow section blue.
4) Dye HALF of the pink section blue.
Sunday, March 25, 2012
TIE Dye Eggs
After watching Martha do this for years, I finally tried it out. These aren't the best photos, but they are the real deal pics from my house.
First, you have to find a bunch of silk ties to cut up (Salvation Army, Goodwill, ask friends).
Cut the ties up - you need squares of just the silk design part, discard the rest. You should be able to get enough silk from each tie to do 2-3 eggs at least.
Face the good side of the tie fabric IN and wrap around the egg. Secure with a rubber band or tie tight with string.I don't have a good shot of this here, but if you want to do multiple eggs, also wrap with a piece of muslin or cotton (like an old sheet cut up). This is what you see in boiling pot photo.
Boil for about 15 minutes.
Again, I don't eat the eggs.
Once cooled, cross your fingers and unwrap!
Martha says 20 minutes and you can eat the eggs: http://www.marthastewart.com/269788/silk-tie-easter-eggs
Paper Reinforcements
Since you can use pretty much any kind of sticker on dry eggs before you dye them, try paper reinforcement stickers (you know...the ones that look like little Cheerios). The all plasticy ones work better than the paper ones, if you can find them. One pack of reinforcements is PLENTY, trust me.
Tuesday, March 13, 2012
Dimensional Fabric Paint
Once you are done dying your eggs, you can use dimensional fabric paint to add decorations. I'm sort of a mini-dot fan, but you can add whatever you want (words, squiggles, spirals, etc).
If the tip of your paint bottle nozzle gets clogged, sort of pull the tip off (lean it to one side), use a straight pin to get the clog out, and replace the tip.
A lot of people ask me if it's OK to eat the eggs after doing this. I have no idea. I rarely eat any eggs I color... sorry. If you aren't sure - then don't.
Monday, March 12, 2012
Masking Tape
Masking tape works on eggs, too. The edges will be a little fuzzier than electrical tape, but it depends on what look you are going for (and, often what you happen to have around the house). This example is pretty tame, but you can cut out letters, shapes, and more. I once did a landscape image on an egg with different "layers" of mountains and such. You have to really think backwards - but it works!
Subscribe to:
Posts (Atom)